 |
Field Descriptions | Related
Help Topics | Additional Information
| Locating this Page |
|
Field Descriptions | Related
Help Topics | Additional Information
| Locating this Page ||
Field Descriptions | Related
Help Topics | Additional Information
| Locating this Page |
Use this page to edit the layout of the page. You can also use this page to edit the content of the page.
 You
can only see the links for actions that you are authorized to perform. If you
do not see a particular link, you do not have the page group or page privileges
to perform that action.
You
can only see the links for actions that you are authorized to perform. If you
do not see a particular link, you do not have the page group or page privileges
to perform that action.
If you cannot perform actions on certain areas (or regions) of the page, the Enable Users To Include Content In This Region option for the region may not be selected. Contact your page designer for more information.
 Field
Descriptions
Field
Descriptions
| Field | Description |
|---|---|
 |
Click this icon to access the page's property sheet. Display this sheet to view required and optional properties. Required properties include:
Optional Properties include:
|
| Edit Page | Display only. Indicates that you are in the Edit Page mode. |
| <Page path> | Displays the path leading from the host page group's root page to the current page. Click a link to go to a page higher in the page group hierarchy. |
| Link: Go to Page | Click to go to a page that you select. The target page displays in the current edit mode. |
| Link: Home | Click to go to the page specified as the portal's home. |
| Link: Builder | Click to go to the Builder page. |
| Link: Navigator | Click to display the Navigator. |
| Link: Help | Click to display help for the page. |
| Toolbar: Editing Views | Select from:
|
| Toolbar: Pending Items | Click Preview to preview items that are pending approval directly on the page. Note: This mode is only available if approvals are enabled for the page group. |
| Toolbar: Mobile | Click Preview to preview how the page looks in a mobile device. Note: This mode is only available if mobile support is enabled for your portal. |
| Toolbar: View Page | Click to display the page without the editing tools. Note: This link changes to "View Template" when editing a template. |
| Toolbar: Page Group | Click Properties to edit the properties of the page group that owns this page. |
| Toolbar: Page | Click:
Note:
|
| Toolbar: Create | Click Sub-Pages to create another page that is hierarchically beneath this page. |
| Toolbar: Edit Template | Click to edit the portal template on which the current page is based. After you click this link, another link displays in this link's place, Back to Page. You can click this after you edit the template. It returns you to the page where you started. Note: This only appears when the page you are editing is based on a Portal Template. It applies only to Portal Templates for pages and not to Portal Templates for items, HTML page skins, nor HTML content layouts. |

| Field | Description |
|---|---|
| Show | To show a hidden portlet, item, or tab, select the check box next to its name and click Show. You can select multiple portlets, items, and tabs for showing. |
| Hide | To hide a portlet, item, or tab, select the check box next to its name and click Hide. You can select multiple portlets, items, and tabs for hiding. Note: Hiding a portlet, item, or tab does not remove it from the page. It merely prevents it from displaying when users view the page. You can still see the portlet, item, or tab in Edit mode, where you can choose to show it again. Hidden portlets, items, and tabs are grayed out in Edit mode. |
| Delete | To delete a portlet, item, or tab, select the check box next to its name and click Delete. A confirmation screen is displayed where you can choose to continue or cancel the deletion. You can select multiple portlets, items, and tabs for deleting. Note: Once you click Delete, there is no opportunity to relocate the tab's content to another tab. Be sure to do so before clicking Delete. |
| Move | To move a portlet or item to a different region, select the check box next to its name and click Move. A screen is displayed in which you can select the region where you want to move the portlet or item. You can select multiple portlets or items for moving, but not a combination of portlets and items. You can move portlets to portlet or undefined regions, and items to item or undefined regions. Notes:
|
| Share | To make a particular instance of a portlet, including all its personalizations, available for use in other pages, select the check box next to the portlet's name and click Share. A screen is displayed where you can choose to continue or cancel the share operation. You can select multiple portlets for sharing. When you share a portlet, it becomes available in the portlet repository under Shared Instances. Note: You can share only portlets; not items or tabs. Should you try to share a non-sharable object, Oracle Portal returns an error message. |
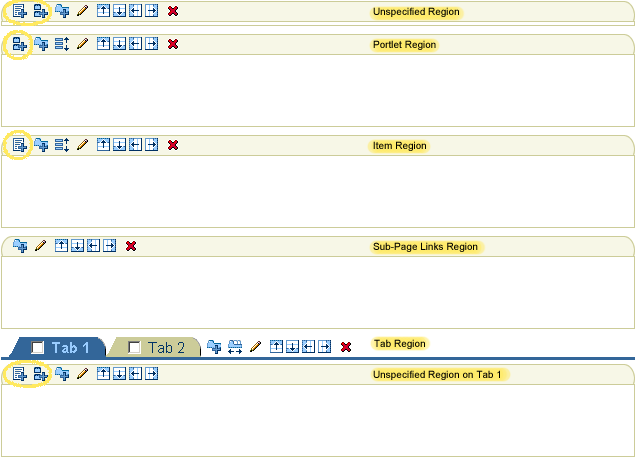
| Field | Description |
|---|---|
 |
Click to add a portlet to this region. |
 |
Click to add an item to this region. |
 |
Click to add a tab to this region. |
 |
Click to change the order of appearance of items or portlets in this region. |
 |
Click to change the order of tabs in this region. |
 |
Click to edit the properties of the region. |
 |
Click to add a region above this region. |
 |
Click to add a region below this region. |
 |
Click to add a region to the left of this region. |
 |
Click to add a region to the right of this region. |
 |
Click to delete this region. |

| Field | Description |
|---|---|
| check box | Select to perform an action (Hide, Show, Move, Delete) on this tab. |

| Field | Description |
|---|---|
| check box | Select to perform an action (Hide, Show, Move, Delete, Share) on this item or portlet. |
 |
Click to edit the default properties of the portlet. Note: Any changes you make to the default properties of a portlet are visible to everyone who views this page. If you want your changes to be visible only to yourself, switch to View mode and personalize the portlet instead. If the page is based on a Portal Template, the Edit Defaults link does not display for any portlets that are part of the template. |
| Field | Description |
|---|---|
 |
Appears next to items and portlets that are inherited from a template. You can move the mouse pointer over this icon to find out from which template the item or portlet is inherited. |
Portal Smart Link items appear in parentheses on this page.
When you add a region, much of the configuration specified for the original region is duplicated. For example, the original and added regions share a common display name. If you make the second region the same type as the first, all configuration values are copied. If you make it a different type, only some values are copied. Not all configuration values are relevant from one type of region to another, that is, from a portlet-type region to an item-type region.
Related
Help TopicsAdditional
InformationFor more information, go to the Oracle Portal documentation page on the Oracle Technology Network.
Locating
this PageThis opens the page in Edit mode.
Note: If the page is not included in those listed in the Page Groups portlet, click the More Pages ... link that displays at the end of the list.
If the page is a sub-page, drill down through the resulting list of pages until you reach the point where your page is listed. Click the Edit link next to the target page.
Copyright © 1994, 2009, Oracle. All rights reserved.